HIT-OS LAB3 操作系统的引导
操作系统的引导
改写 bootsect.s 主要完成如下功能:
bootsect.s 能在屏幕上打印一段提示信息
XXX is booting…
其中 XXX 是你给自己的操作系统起的名字,也可以显示一个特色 logo ,以表示自己操作系统的与众不同。
由于 logo 占用字节数过大,选择在 bootsect 模块中打印提示信息
StellarOS is booting…
打印提示信息部分代码位于 ok_load_setup 标签附近,在成功将 setup 模块从磁盘加载至内存 0x90200 处,并取每磁道扇区数保存在变量 sectors 处后,利用 BIOS INT 0x10 功能 0x03 和 0x13 来显示信息。

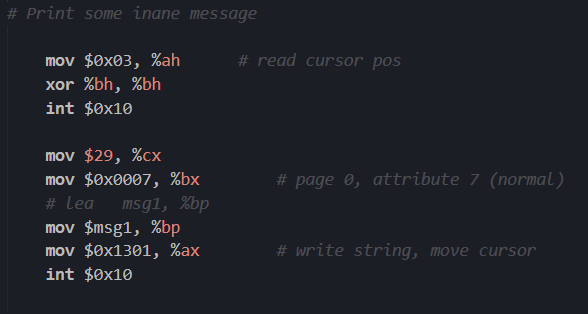
如图 1,首先通过 INT 0X10 功能 0x03 定位当前光标位置,光标位置存储在寄存器 dx 中 (dh - 行;dl - 列),随后通过 INT 0X10 功能 0X13 由寄存器 dx 标识的光标位置起始,打印若干长度字符串至屏幕并移动光标至字符串结尾,其中 es:bp 指向要显示的字符串,寄存器 cx 中存放要打印的总字节数。
因此,为更改打印的提示信息,只需将 msg1 中 ascii 信息适当更改并调整 cx 中长度匹配 msg1 总字节数。
1 | msg1: |
1 | mov $29, %cx |
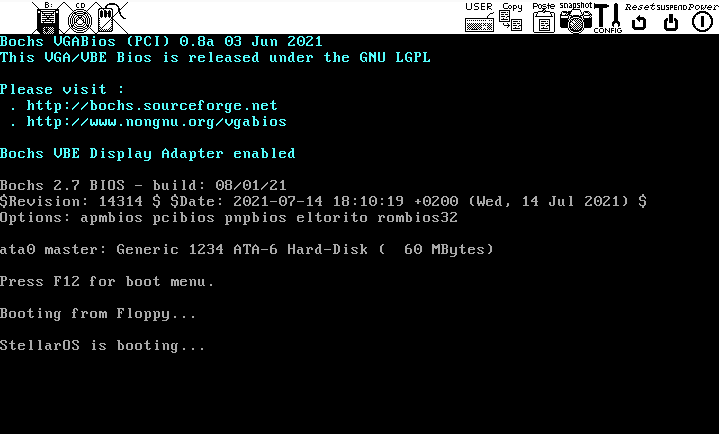
如图 2 所示,经编译后生成的可执行文件 Image 大小为 512 字节,对应 BIOS 加载的一个扇区长度。

如图 3,使用 dbg-bochsgui 运行调试 Image,提示信息正确打印在屏幕中。

改写 setup.s 主要完成如下功能:
bootsect.s 能完成 setup.s 的载入,并跳转到 setup.s 开始地址执行。而 setup.s 向屏幕输出一行
Now we are in SETUP
此处,依旧选择 BIOS 的 INT 0x10 功能 0x03 和 0x13 来显示信息,由于 setup 模块中有较多信息需打印,因此将定位光标功能封装成函数 locate_cursor,将打印信息功能封装成函数 print_message。
1
2
3
4
5locate_cursor:
mov $0x03, %ah # read cursor pos
xor %bh, %bh
int $0x10
retprint_message 函数将欲打印字符串的偏移索引作为第一个参数,字节长度作为第二个参数,在函数调用前依次压栈。
1
2
3
4
5
6
7
8
9print_message:
call locate_cursor
mov %sp, %bp
mov 4(%bp), %cx # length
mov 2(%bp), %bp # msg
mov $0x0007, %bx # page 0, attribute 7 (normal)
mov $0x1301, %ax # write string, move cursor
int $0x10
ret需注意的是,在调用函数 print_message 前,需将 es 指向 SETUPSEG,即 setup.s 代码段的段地址,使 es:bp 正确指向要显示的字符串。
1
2mov $SETUPSEG, %ax # es point at SETUPSEG
mov %ax, %es为打印目的提示信息,涉及到的代码如下:
1
2
3
4
5
6
7
8
9# Print some inane message (ss:esp already in 0x9ff00)
push $23 # length of msg0(cx)
push $msg0 # location of msg0(bp)
call print_message
add $4, %sp # pop
...
msg0:
.ascii "Now we are in SETUP"
.byte 13,10,13,10随后,同样可以调用函数 print_message 打印 logo:
1
2
3
4
5
6
7
8
9
10
11
12
13
14
15
16
17
18
19# Print my logo
push $298
push $logo
call print_message
add $4, %sp # pop
...
logo:
.ascii " _____ _ _ ____ ____ "
.byte 13,10
.ascii " / ____\\ _ | | | / __ \\ / ___\\ "
.byte 13,10
.ascii " | (___ _| |_ ___| | | __ _ _ __| | | | (___ "
.byte 13,10
.ascii " \\___ \\\\ _/ _ | | |/ _` | '__| | | |\\___ \\ "
.byte 13,10
.ascii " ____) || | __| | | (_| | | | |__| |____) |"
.byte 13,10
.ascii " \\_____/ \\___\\___|_|_|\\__,_|_| \\____/ \\____/ "
.byte 13,10,13,10,13,10setup.s 能获取至少一个基本的硬件参数(如内存参数、显卡参数、硬盘参数等), 将其存放在内存的特定地址,并输出到屏幕上。
原代码已经通过若干 BIOS INT 中断获取内存大小、显卡参数、硬盘参数表并放置在 0x90000 起始的内存中,因此只需从对应位置中取出欲打印的参数并调用相关打印函数即可。
打印字符串形式的提示信息依然使用 print_message 函数,为以 16 进制打印参数,使用如下函数:1
2
3
4
5
6
7
8
9
10
11
12
13
14
15print_hex:
mov $4, %cx # 4 numbers in hexidemical
mov (%bp), %dx
print_digit:
rol $4, %dx # circle left by 4 bits
mov $0x0e0f, %ax # 4 bits mask in al
and %dl, %al
add $0x30, %al # transform into char
cmp $0x3a, %al
jl outp # '0'~'9'
add $0x07, %al # 'a'~'f'
outp:
int $0x10
loop print_digit
ret使用函数 print_nl 换行:
1
2
3
4
5
6print_nl:
mov $0xe0d, %ax # CR
int $0x10
mov $0xa, %al # LF
int $0x10
ret打印扩展内存大小涉及代码如下:
1
2
3
4
5
6
7
8
9
10
11
12
13
14
15# Print some inane message
push $26
push $msg1
call print_message
add $4, %sp # pop
# Print memory size
mov %ds:2, %ax
push %ax
mov %sp, %bp
call print_hex
call print_nl
add $2, %sp # pop
...
msg1:
.ascii "Extended Memory Size(KB): "打印显卡参数涉及代码如下:
1
2
3
4
5
6
7
8
9
10
11
12
13
14
15
16
17
18
19
20
21
22
23
24
25
26
27
28
29
30
31
32
33
34
35
36
37
38
39
40
41
42
43
44
45
46
47
48
49
50
51
52
53
54
55
56
57
58# Print some inane message
push $19
push $msg2
call print_message
add $4, %sp # pop
# Print some inane message
push $14
push $msg3
call print_message
add $4, %sp # pop
# Print display page
mov %ds:4, %ax
push %ax
mov %sp, %bp
mov $2, %cx # 2 numbers in hexidemical
mov (%bp), %dx
call print_digit
call print_nl
add $2, %sp # pop
# Print some inane message
push $12
push $msg4
call print_message
add $4, %sp # pop
# Print video mode
mov %ds:5, %ax
push %ax
mov %sp, %bp
mov $2, %cx # 2 numbers in hexidemical
mov (%bp), %dx
call print_digit
call print_nl
add $2, %sp # pop
# Print some inane message
push $14
push $msg5
call print_message
add $4, %sp # pop
# Print window width
mov %ds:6, %ax
push %ax
mov %sp, %bp
mov $2, %cx # 2 numbers in hexidemical
mov (%bp), %dx
call print_digit
call print_nl
add $2, %sp # pop
...
msg2:
.byte 13,10
.ascii "Video card Info"
.byte 13,10
msg3:
.ascii "Display Page: "
msg4:
.ascii "Video Mode: "
msg5:
.ascii "Window Width: "打印硬盘 hd0 参数涉及代码如下:
1
2
3
4
5
6
7
8
9
10
11
12
13
14
15
16
17
18
19
20
21
22
23
24
25
26
27
28
29
30
31
32
33
34
35
36
37
38
39
40
41
42
43
44
45
46
47
48
49
50
51
52
53
54
55
56
57
58
59
60
61
62
63
64# Print some inane message
mov $SETUPSEG, %ax
mov %ax, %es # recover es at SETUPSEG
push $12
push $msg6
call print_message
add $4, %sp # pop
# Print some inane message
push $11
push $msg8
call print_message
add $4, %sp # pop
# Print cylinders
mov $INITSEG, %ax
mov %ax, %ds
mov %ds:0x80, %ax
push %ax
mov %sp, %bp
call print_hex
call print_nl
add $2, %sp # pop
# Print some inane message
push $9
push $msg9
call print_message
add $4, %sp # pop
# Print headers
mov %ds:0x81, %ax
push %ax
mov %sp, %bp
mov $2, %cx # 2 numbers in hexidemical
mov (%bp), %dx
call print_digit
call print_nl
add $2, %sp # pop
# Print some inane message
push $19
push $msg10
call print_message
add $4, %sp # pop
# Print sectors per track
mov %ds:0x8d, %ax
push %ax
mov %sp, %bp
mov $2, %cx # 2 numbers in hexidemical
mov (%bp), %dx
call print_digit
call print_nl
add $2, %sp # pop
...
msg6:
.byte 13,10
.ascii "HD0 Info"
.byte 13,10
msg7:
.byte 13,10
.ascii "HD1 Info"
.byte 13,10
msg8:
.ascii "Cylinders: "
msg9:
.ascii "Headers: "
msg10:
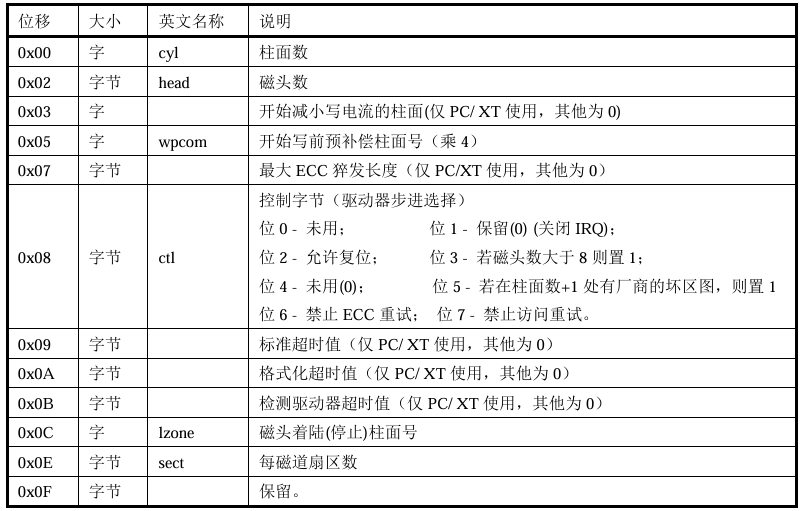
.ascii "Sectors per Track: "需注意,在获取硬盘 hd0 参数表并将其存放至 0x90080 时改变了 es 的值,因此需将其恢复至 $SETUPSEG,可能存在的硬盘 hd1 参数表代码只需略微改动故不再赘述。磁盘参数表结构如下表所示:

setup.s 不再加载Linux内核,保持上述信息显示在屏幕上即可。
1
2
3
# loop here
circle:
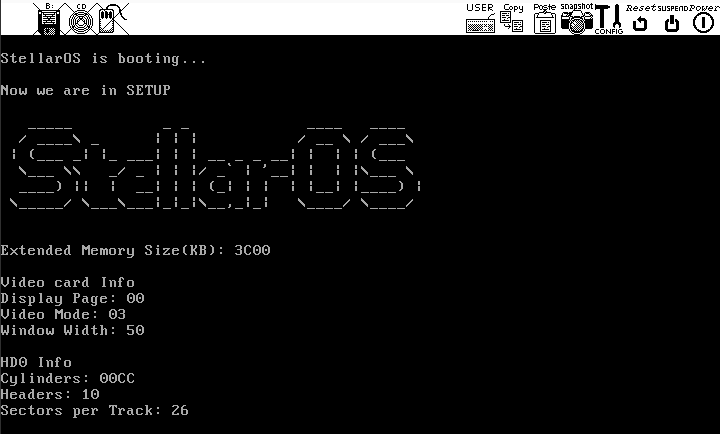
jmp circle # loop forever如图 4,使用 dbg-bochsgui 运行调试编译得到的 Image 文件。

相关问题
有时,继承传统意味着别手蹩脚。x86 计算机为了向下兼容,导致启动过程比较复杂。请找出 x86 计算机启动过程中,被硬件强制,软件必须遵守的两个“多此一举”的步骤 (多找几个也无妨),说说它们为什么多此一举,并设计更简洁的替代方案。
计算机在由 16 位逐渐演化至当今的 64 位过程中,为满足兼容性问题不得不由实模式开始运行,并且 BIOS 的自检程序同样运行在实模式下。同样的,BIOS 相关程序占用了大量的内存空间,导致在加载引导程序时不得不将程序放置在剩余地址空间内,在使用 BIOS 中断后才能将引导程序移动至起始低地址空间将 BIOS 相关程序覆盖。在由实模式切换至保护模式时,必须先将 GDT、IDT 等描述符表进行伪初始化,这些过程在后续运行在 32 位保护模式下的系统程序中都会再次进行。欲设计更简洁的替代方案,可尝试直接由 32 位保护模式下进行初始化,为此还需编写 32 位保护模式下的 BIOS 程序。
